Samba Server
Samba Server
Samba server can be used to expose Persistent Volume Claim via CIFS/SMB protocol as a network drive reachable at specified URL in the form of \\[namespace]-[samba_name].dyn.cloud.e-infra.cz\data . Persistent Volume Claim (PVC) is used as a storage for running applications in Kubernetes. If you want to upload/download data to/from PVC using GUI, Samba server is a convenient way to do so.
Prerequisities
Samba server works only when you want to expose already existing PVC! Therefore, make sure your PVC already exists.
Installation
- In the Rancher GUI, check the name of the PVC you would like to expose. In the example, we are going to expose PVC with name
matlab-homein namespacespisakova-ns.

- Navigate to all available applications and select
samba, then click on install button in the top right corner.

- Select the namespace, where application will be deployed. You must choose the same namespace as the namespace of the PVC you want to expose. Therefore, in the example we select namespace
spisakova-ns. Select a name for your samba application that will form a part of the final url; the name must be unique in the namespace. In the example, we will usesamba-matlab.

- In the server settings, set password for the samba server. Select the PVC you want to expose, in the example we select
matlab-home.

4.1. Your network drive will be available only in MUNI network or after connecting to MUNI VPN. If you want to access the network drive from elsewhere, select public exposure in the second tab Expose type.

- Wait, until samba server is installed, it should take a couple of seconds.
Connection
The final URL is composed of selected namespace and samba application name. In our case, we can see name (samba-matlab) and namespace (spisakova-ns) next to green Deployed (which is a sign of successfull installation together with SUCCESS message in the logs boxs at the bottom of the page). Therefore, the final url is spisakova-ns-samba-matlab.dyn.cloud.e-infra.cz. Username is always user, password is the one you chose while setting up the application.
- Linux --- Firstly, install
cifs-utilson Ubunutu/Debian OS. After installation, enter commandmount.cifs //[namespace]-[samba_name].dyn.cloud.e-infra.cz\data [mount_location] -o username=user. Provide password. Then, you can change directory to location chisen as mountpoint and work with network drive as regular directory.

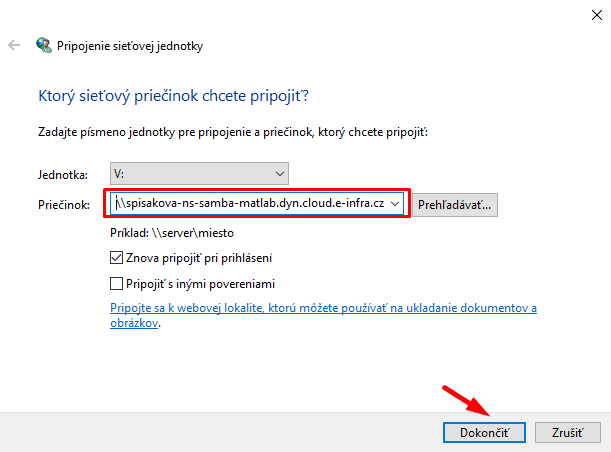
- Windows --- Open File Explorer from the taskbar or the Start menu, or press the Windows logo key + E. Select This PC from the left pane. Then, on the Computer tab, select Map network drive. In the Folder box, type the path of the folder or computer
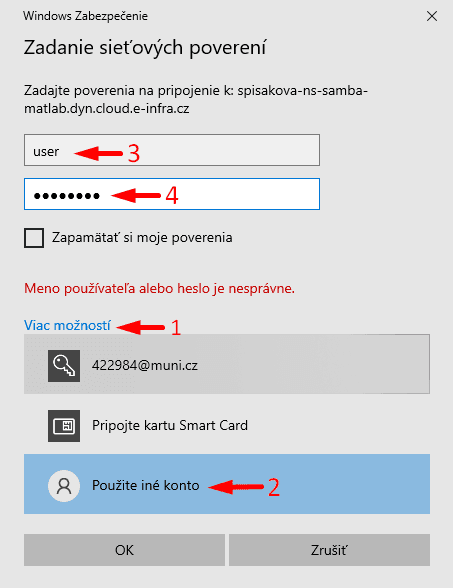
\\[namespace]-[samba_name].dyn.cloud.e-infra.cz\data. Select logging is asanother accountand provide credentials.


- MacOS --- open Safari and provide url in the form of
smb://[namespace]-[samba_name].dyn.cloud.e-infra.cz\data; the\datapart is necessary! Click onAllow, provide the credentials as registered user (username is user, password is the one you set). Connect and nework drive will be available in the Finder. You can later unmount the drive using unmount button.


