Exposing Applications
This chapter explains how to configure external access to your application from an external network (or from “outside” the cluster). Although it is possible to access your application directly via an IP address, this approach is discouraged. Instead, follow the instructions below to properly expose your application.
There are two main types of applications that can be exposed: web-based applications and other applications. The primary distinction between these types is their IP address requirements. Web-based applications share an IP address with other web-based applications, whereas other applications require a dedicated IP address for each service. Since the number of available IP addresses is limited, the web-based approach is preferred whenever possible.
Throughout this documentation, YAML fragments are provided. These YAML definitions should be deployed using kubectl as shown below:
kubectl create -f file.yaml -n namespacewhere file.yaml contains the YAML definitions and namespace is the namespace where the application is running.
Prerequisite
This guide assumes that your application (Deployment) is already deployed. If you are unsure, refer to the Hello World example.
Web-based Applications
Web-based applications communicate using the HTTP protocol and are exposed using Ingress resources.
Overview
The overall architecture is illustrated in the following figure:

To expose a web-based application, you need:
- A
Servicethat binds a port to your application. - An
Ingressresource that exposes theServiceto the Internet.
Assume we have an application running on port 8080. First, we define a Service:
apiVersion: v1
kind: Service
metadata:
  name: application-svc
spec:
  type: ClusterIP
  ports:
  - name: application-port
    port: 80
    targetPort: 8080
  selector:
    app: application
In this configuration:
- The
selector.app: applicationmust match the application label in theDeployment. - The
application-svcandapplication-portvalues are arbitrary names.
After creating the Service, we define an Ingress:
apiVersion: networking.k8s.io/v1
kind: Ingress
metadata:
  name: application-ingress
  annotations:
    kubernetes.io/tls-acme: "true"
    cert-manager.io/cluster-issuer: "letsencrypt-prod"
spec:
  ingressClassName: nginx
  tls:
    - hosts:
        - "application.dyn.cloud.e-infra.cz"
      secretName: application-dyn-cloud-e-infra-cz-tls
  rules:
  - host: "application.dyn.cloud.e-infra.cz"
    http:
      paths:
      - backend:
          service:
            name: application-svc
            port:
              number: 80
        pathType: ImplementationSpecific
Here:
- The
service.name: application-svcmust match the metadata name of theService. - The
Ingressexposes the application at the URLapplication.dyn.cloud.e-infra.cz, which serves as the accessible endpoint (functioning as the “IP address” for reaching your application). - If the domain is within
dyn.cloud.e-infra.cz, it will be registered automatically. - The
tlssection enables automatic certificate management via Let’s Encrypt.
Note
If the tls section is included, TLS termination occurs at the NGINX Ingress. Your application should serve traffic over HTTP, while external communication is secured via HTTPS.
Important Considerations
❗ Security Warning:
TLS is terminated at the cluster boundary when using NGINX Ingress. Communication within the cluster, especially within a single node, remains unencrypted. If full end-to-end encryption is required, you should:
- Omit the tls and annotations sections.
- Provide a certificate and key directly within your Pod.
❗ Handling Mixed HTTP/HTTPS Configurations:
Some applications may be confused when configured to use HTTP internally but exposed as HTTPS. If your application generates absolute URLs, ensure they use HTTPS.
-
Ingresssets theHTTP_X_SCHEMEheader toHTTPSwhen TLS is terminated. -
However, many applications expect
X_FORWARDED_PROTOinstead (which KubernetesNGINXdoes not set). For example, in Django, you should set:SECURE_PROXY_SSL_HEADER = ("HTTP_X_SCHEME", "https")
If your application requires HTTPS end-to-end, see the HTTPS Target section below.
Custom Domain Name (FQDN)
It is possible to use a custom domain name instead of *.dyn.cloud.e-infra.cz.
-
Set up a
CNAMEDNS record.- For the
kuba-cluster, set theCNAMEtarget tokuba-pub.cerit-sc.cz. - For the
kubh-cluster, set theCNAMEtarget tokubh-pub.cerit-sc.cz.
- For the
-
Define an
Ingresswith the custom domain:ingress.yaml apiVersion: networking.k8s.io/v1 kind: Ingress metadata: name: application-ingress annotations: kubernetes.io/tls-acme: "true" cert-manager.io/cluster-issuer: "letsencrypt-prod" spec: ingressClassName: nginx tls: - hosts: - "my-name" secretName: my-name-tls rules: - host: "my-name" http: paths: - backend: service: name: application-svc port: number: 80 pathType: ImplementationSpecific
Note
The CNAME must be pre-set and propagated before requesting a TLS certificate. Let’s Encrypt requires domain verification, meaning seamless migration from another system to this infrastructure is not easily possible.
Authentication
You can secure access to your Ingress-exposed application by requiring user authentication. This is done using a Secret and annotations.
-
Create a Secret:
secret.yaml apiVersion: v1 kind: Secret metadata: name: secretref type: Opaque data: auth: password-
secretrefis an arbitrary name. -
The htpasswd output must be base64-encoded. To generate it:
htpasswd -n username | base64 -w0
This command returns a base64-encoded password string (like `Zm9vOiRhgvYTN2aktYSDEKCg=`), which should replace `password` in the `Secret`. -
-
Add the following annotations to the Ingress:
nginx.ingress.kubernetes.io/auth-type: basic nginx.ingress.kubernetes.io/auth-secret: secretrefsecretrefmust match the metadata name of theSecret.
Important
Authentication only applies to external traffic. Traffic from other pods within the cluster bypasses authentication when communicating directly with the Service IP. To enforce stricter access control, consider using NetworkPolicy. See the Security section.
Large Data Uploads
If your application expects large file uploads, you may need to modify Ingress settings to accommodate higher upload limits:
nginx.ingress.kubernetes.io/proxy-body-size: "600m"
nginx.org/client-max-body-size: "600m"
Replace 600m with the desired maximum upload size.
HTTPS Target
If your application serves HTTPS traffic internally and you want to preserve encryption end-to-end, update your Ingress definition to include the following annotation:
nginx.ingress.kubernetes.io/backend-protocol: "HTTPS"This ensures that traffic between Ingress and the application remains encrypted. However, since the NGINX Ingress component terminates and re-encrypts the traffic, it does not provide true end-to-end encryption.
Limiting External Network Access
You can restrict access to your application at the Ingress level by limiting access to specific IP ranges using the whitelist-source-range annotation.
For example, to restrict access to only the MUNI network:
apiVersion: networking.k8s.io/v1
kind: Ingress
metadata:
  name: application-ingress
  annotations:
    kubernetes.io/tls-acme: "true"
    cert-manager.io/cluster-issuer: "letsencrypt-prod"
    nginx.ingress.kubernetes.io/whitelist-source-range: 147.251.0.0/16
spec:
  ingressClassName: nginx
  tls:
    - hosts:
        - "my-name"
      secretName: my-name-tls
  rules:
  - host: "my-name"
    http:
      paths:
      - backend:
          service:
            name: application-svc
            port:
              number: 80
        pathType: ImplementationSpecific
Note
You can mix CIDRs (e.g., 147.251.0.0/16), individual IP addresses (e.g., 147.251.17.148), and both IPv4 and IPv6 addresses, all separated by commas. As IPv6 adoption continues to grow, be sure to include IPv6 addresses alongside IPv4 to maintain expected functionality.
Debugging: Certificate Not Issued
If your configuration is correct but the TLS certificate is not issued, the problem may be due to resource quotas preventing the required ACME challenge pod from running.
Steps to Debug
-
Check if the Ingress is stuck on the ACME solver:
kubectl get ingress -n [your_namespace]If the output includes
cm-acme-http-solverwith an age of more than a few minutes, this likely indicates an issue.> kubectl get ingress -n [your_namespace] NAME CLASS HOSTS ADDRESS PORTS AGE cm-acme-http-solver-972p9 <none> schema.biodata.ceitec.cz kuba-pub.cerit-sc.cz 80 12m -
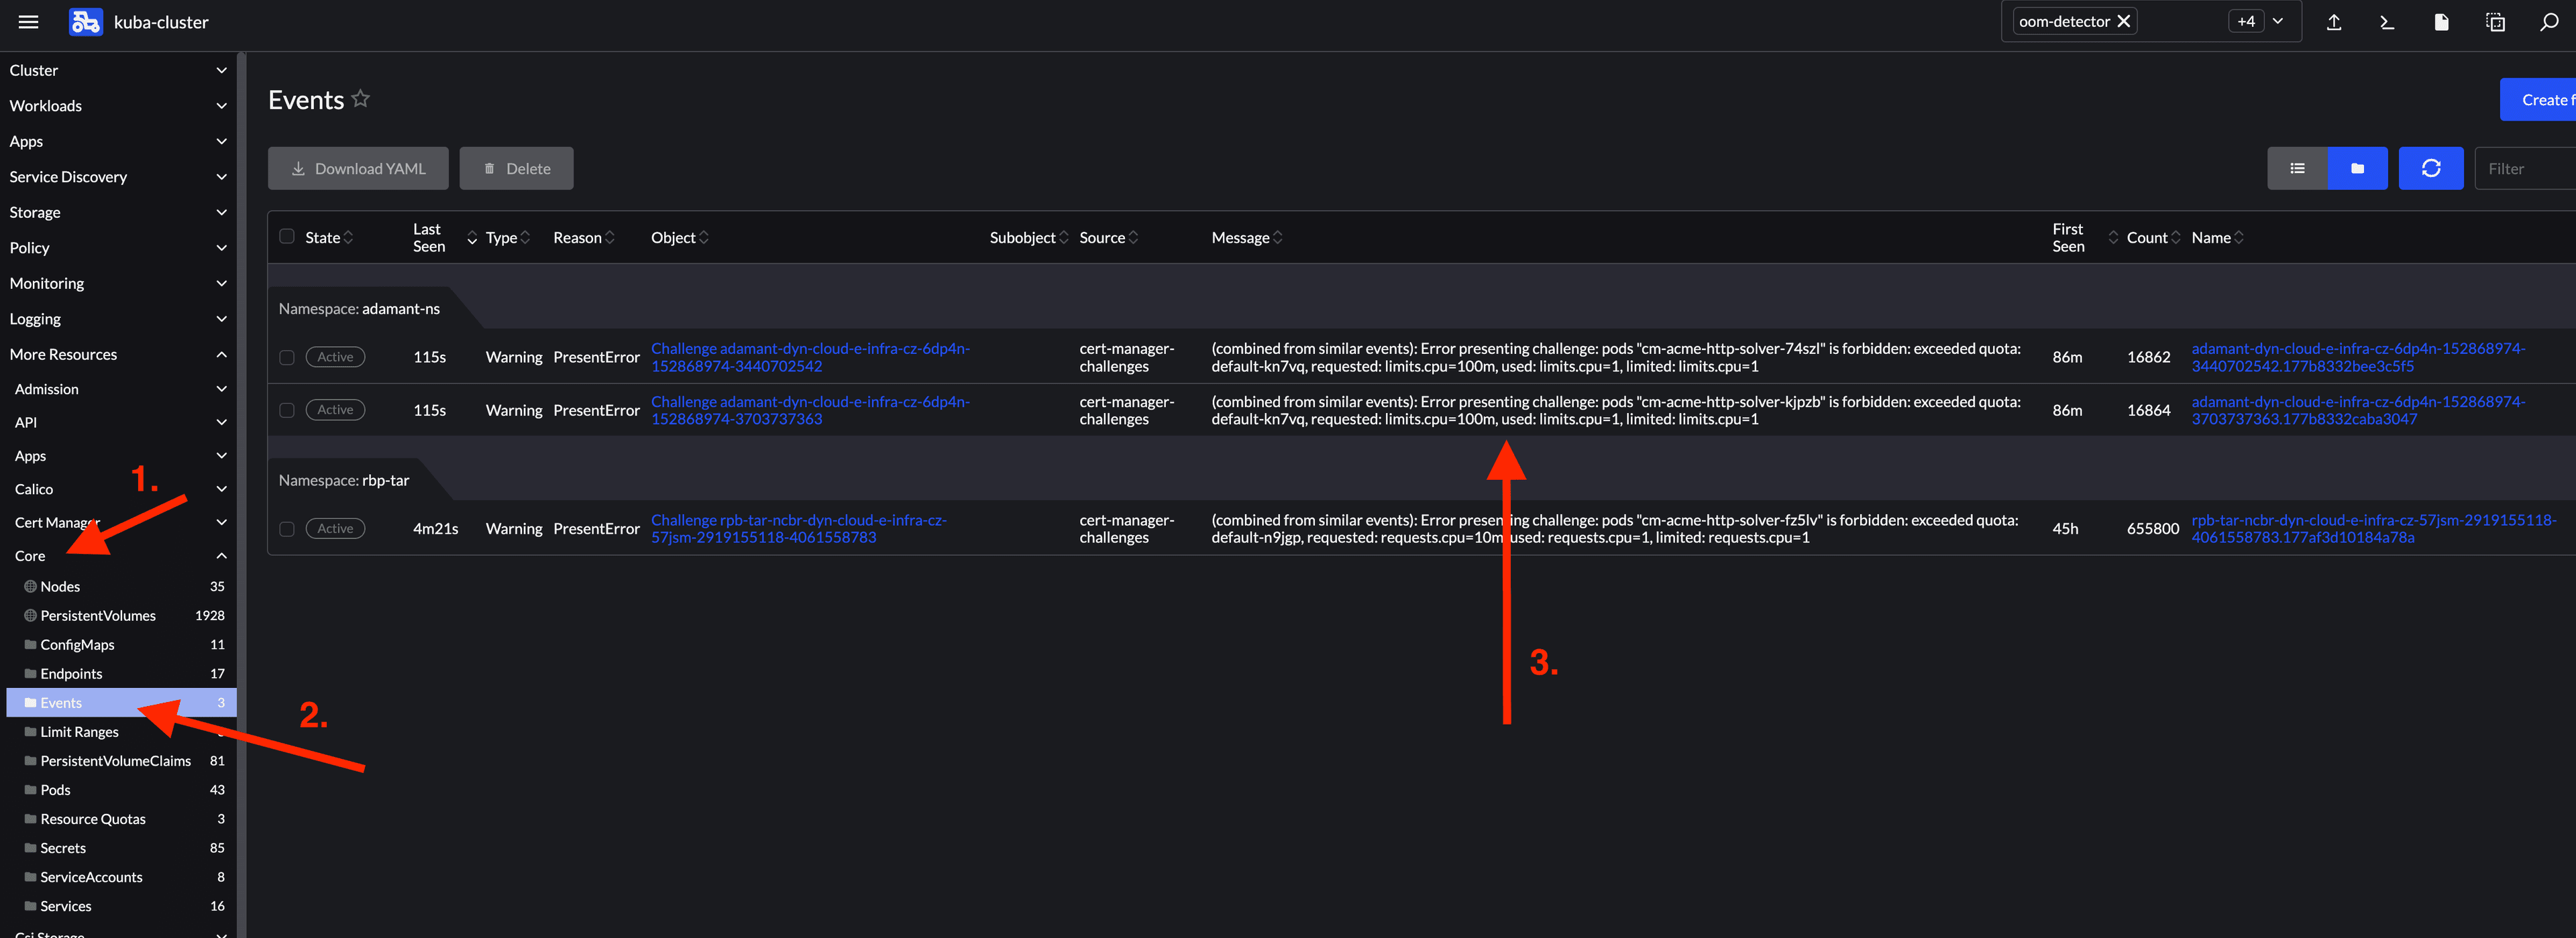
Check for quota-related warnings:
kubectl get events -n [your_namespace]Look for lines mentioning
exceeded quota.> kubectl get events -n [your_namespace] | grep cm-acme-http-solver ... 79s Warning PresentError challenge/adamant-dyn-cloud-e-infra-cz-6dp4n-152868974-3440702542 (combined from similar events): Error presenting challenge: pods "cm-acme-http-solver-74szl" is forbidden: exceeded quota: default-kn7vq, requested: limits.cpu=100m, used: limits.cpu=1, limited: limits.cpu=1 ...
If quota restrictions are the issue, you may need to:
- Increase the namespace resource quota. Each ACME solver requires 100m CPUs and 100 MiB of memory.
- Remove some existing deployments.
You can also view events in the Rancher UI.
Custom Error Pages
By default, our NGINX Ingress Controller in Kubernetes intercepts HTTP errors 500 (Internal Server Error) and 503 (Service Unavailable) and displays a custom error page with brief instructions on how to resolve the issue. However, this behavior is often undesirable for applications that intentionally return these error codes, such as JSON-based REST APIs.
To allow the original error response to be passed to the client, you need to disable the default error handling. While it is not possible to completely disable error handling once it is globally enabled, you can control which error codes are handled using the nginx.ingress.kubernetes.io/custom-http-errors annotation.
Solution
Set the nginx.ingress.kubernetes.io/custom-http-errors annotation to an unused error code, such as 599, which effectively disables error handling for all other errors (including 500 and 503), as NGINX will only attempt to handle the specified error code (599).
Example
apiVersion: networking.k8s.io/v1
kind: Ingress
metadata:
  annotations:
    cert-manager.io/cluster-issuer: letsencrypt-prod
    kubernetes.io/tls-acme: 'true'
    nginx.ingress.kubernetes.io/custom-http-errors: '599'
With this configuration, NGINX will no longer intercept 500 and 503 errors, allowing the original error message from the application to be returned to the client.
Other Applications
For applications that do not use the HTTP protocol, exposure is done via a Service without Ingress.
apiVersion: v1
kind: Service
metadata:
  name: application-svc
  annotations:
    external-dns.alpha.kubernetes.io/hostname: application.dyn.cloud.e-infra.cz
spec:
  type: LoadBalancer
  allocateLoadBalancerNodePorts: false
  ports:
  - port: 22
    targetPort: 2222
  selector:
app: application- The
selector.app: applicationmust match theDeployment. - If the annotation
external-dns.alpha.kubernetes.io/hostnameis set withindyn.cloud.e-infra.cz, the name is automatically registered in DNS.
Checking the Assigned Public IP
Run:
kubectl get svc -n namespacewhere namespace is the Namespace of the Service. The IP address will be displayed in the EXTERNAL-IP column.
Private MUNI IP
To expose the application only within the MUNI network or MUNI VPN, use the following Service annotation:
metallb.io/address-pool: privmuniThis method is preferred as it avoids consuming a public IP.
apiVersion: v1
kind: Service
metadata:
  name: application-svc
  annotations:
    metallb.io/address-pool: privmuni
    external-dns.alpha.kubernetes.io/hostname: application.dyn.cloud.e-infra.cz
spec:
  type: LoadBalancer
  allocateLoadBalancerNodePorts: false
  ports:
  - port: 22
    targetPort: 2222
  selector:
    app: application
LoadBalancer Firewall
It is recommended to restrict external access to publicly exposed applications. This can be achieved either at the NetworkPolicy level (note that this works only when externalTrafficPolicy is set to Local) or by using the loadBalancerSourceRanges field in the Service object.
The example below demonstrates how to limit access to the network 147.251.0.0/16 and to a single IP address 1.2.3.4/32. The loadBalancerSourceRanges field always expects values in CIDR notation, so even a single IP address must be expressed with a /32 mask. If you are using both IPv4 and IPv6 address families, be aware that you must specify source ranges for both.
apiVersion: v1
kind: Service
metadata:
  name: application-svc-rw
  annotations:
    external-dns.alpha.kubernetes.io/hostname: application.dyn.cloud.e-infra.cz
spec:
  type: LoadBalancer
  allocateLoadBalancerNodePorts: false
  externalTrafficPolicy: Cluster
  ports:
  - port: 5432
    targetPort: 5432
  selector:
    app: application-rw
  loadBalancerSourceRanges:
  - 147.251.0.0/16
  - 1.2.3.4/32
Sharing an IP Address Across Multiple Services
Since IPv4 addresses are a scarce resource, it’s beneficial to share a single IP address across multiple LoadBalancer services differentiated by port numbers. This can be accomplished by creating multiple Service objects and using the metallb.io/allow-shared-ip annotation to allocate a shared IP address.
The value of this annotation acts as a grouping key: all services with the same key will attempt to share the same IP address, provided it is possible. Therefore, choose a unique key for the annotation to avoid unintended IP sharing between unrelated services.
Below are examples of two LoadBalancer services configured to share the same IP address:
apiVersion: v1
kind: Service
metadata:
  name: application-svc-rw
  annotations:
    external-dns.alpha.kubernetes.io/hostname: application.dyn.cloud.e-infra.cz
    metallb.io/allow-shared-ip: [my-shared-key-for-application]
spec:
  type: LoadBalancer
  allocateLoadBalancerNodePorts: false
  externalTrafficPolicy: Cluster
  ports:
  - port: 5432
    targetPort: 5432
  selector:
app: application-rw apiVersion: v1
kind: Service
metadata:
name: application-svc-ro
annotations:
external-dns.alpha.kubernetes.io/hostname: application.dyn.cloud.e-infra.cz
metallb.io/allow-shared-ip: [my-shared-key-for-application]
spec:
type: LoadBalancer
allocateLoadBalancerNodePorts: false
externalTrafficPolicy: Cluster
ports:
- port: 5433
targetPort: 5432
selector:
app: application-ro Limitations
- If
externalTrafficPolicyis set toLocal, all target Pods must be scheduled on the same node to ensure accessibility. - If
externalTrafficPolicyis set toCluster, Pods can be distributed across multiple nodes, which improves resilience and load distribution.
Last updated on
