BinderHub
BinderHub is a Binder instance running on Kubernetes at binderhub.cloud.e-infra.cz. Binder turns a git repository into a collection of interactive notebooks. It is enough to fill in the git repository name (optionally specific notebook or branch) and binderhub will turn it into a web notebook.
Authentication
To use CERIT-SC BinderHub instance you need to authenticate. Authentication is done via SSO federated login.
Persistence
After the notebook is created, a persistent volume is mounted to the path /home/{username}-nfs-pvc. The same persistent volume will be mounted to that path in each notebook you spawn. So if you want to use data generated in BinderHub instance A in BinderHub instance B, you can write the data to path /home/{username}-nfs-pvc and it will be available for use.
Note: Be careful with paths used in notebooks. Imagine you have two BinderHubs running. In both you write output to the /home/{username}-nfs-pvc/test location. If both notebooks create a file named result.txt, you would overwrite the file. It is a good practice to create a new directory in the path /home/{username}-nfs-pvc for each BinderHub instance.
Resources
Each user on your JupyterHub can use a certain amount of memory and CPU. You are guaranteed 1G of RAM and 1 CPU and you can use up to 16G of RAM and 8 CPU. Resource limits are a hard limit on the available resources.
Custom resources
If you need to specify other resource amounts or attach GPU, you can create a .resources file in the root of git repository. The file can look like:
# This file is for resource requests in CERIT-SC
# Do not change
gpu=1
cpur=2
cpul=4
memr=1
meml=4
Lines starting with # are ignored (useful for commens); other stand for:
gpu=[number_of_gpu_request]cpur=[number_of_cpu_request]cpul=[number_of_cpu_limit]memr=[GB_of_RAM_request]meml=[GB_of_RAM_limit]
RAM is assigned in GB, do not specify any units. By default, no GPU is assigned. If the .resources file does not contain any of the lines, defaults are used. Similarly, if the file specifies only some lines, the defaults for the missing lines are used.
The setting currently works for repositories hosted on github.com. If you use another git service (gitlab, zenodo, …), please contact us at IT Service desk.
SSH keys inside the instance
For more flexibility, we generate an SSH key pair for everyone who spawns at least one Jupyter notebook via BinderHub. This SSH keypair is mounted on the notebook instance (/home/jovyan/.ssh/ssh.priv and /home/jovyan/.ssh/ssh.pub) and can be used to import public key to GitHub account. This way you can update and work with your Git repositories directly from your notebook.
The same SSH key pair is mounted on all your BinderHub notebooks.
Where to find running notebooks
You can find your running notebooks at https://bhub.cloud.e-infra.cz/. Clicking on the address will redirect you to the notebook instance. Because redirection links contain random strings, it is recommended to use a browser that can store cookies and does not require you to remember long notebook addresses. Also, avoid incognito windows because the session cookie won’t be saved and when you close the tab, you won’t find the instance in Control Panel.
Limits
Currently, each user is limited to spawning 5 projects. If you reach the quota and try to deploy a new instance, an error will appear below the loading bar of the BinderHub index page.
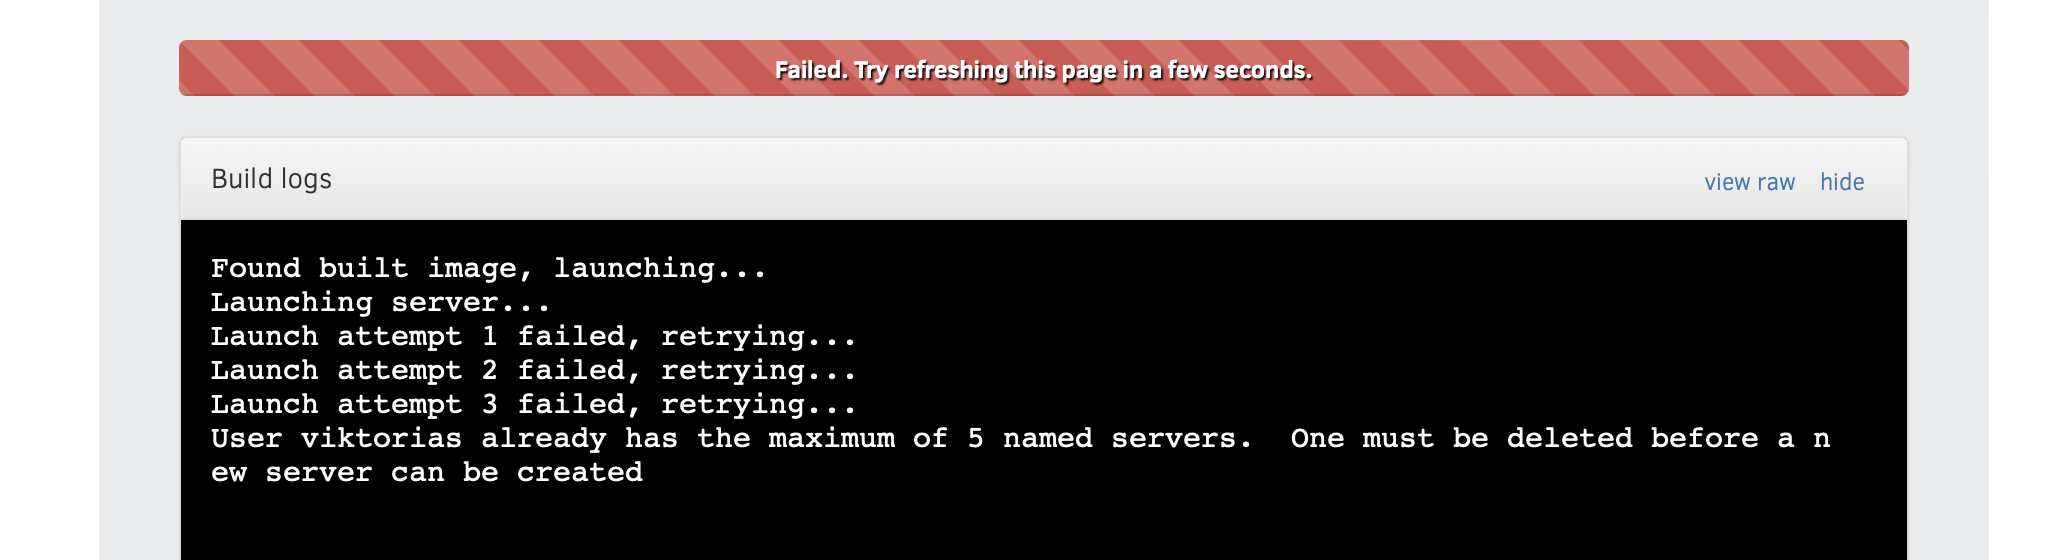
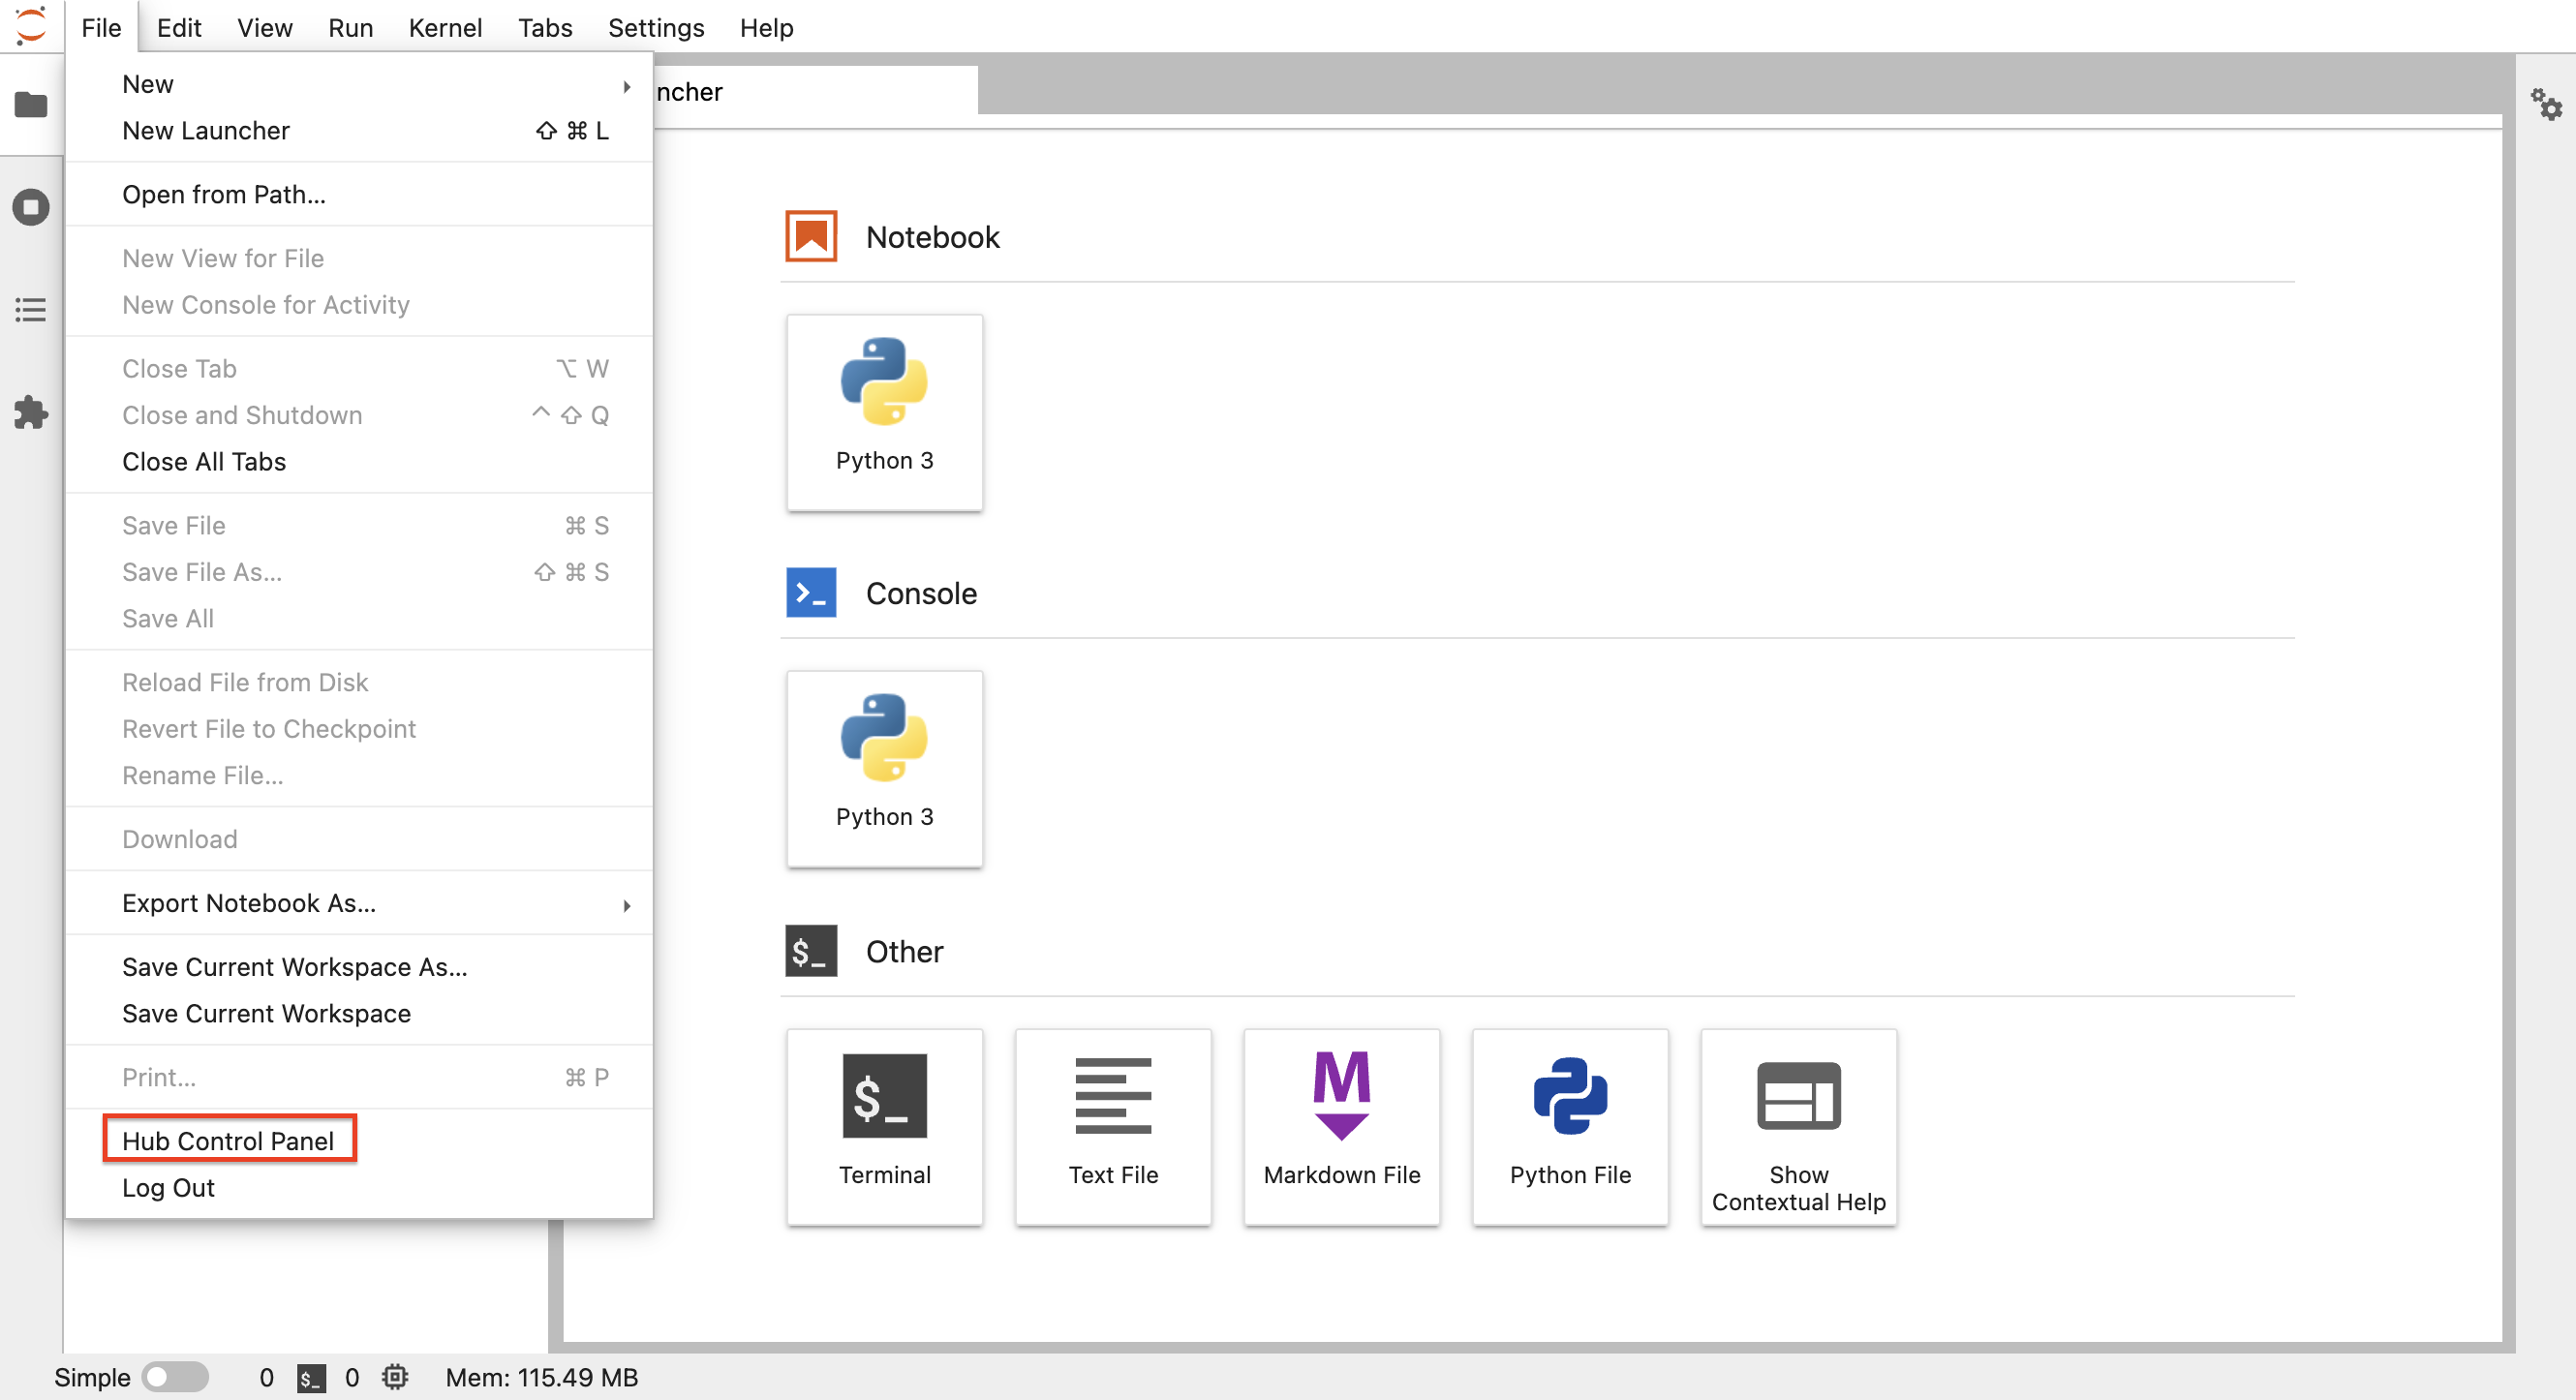
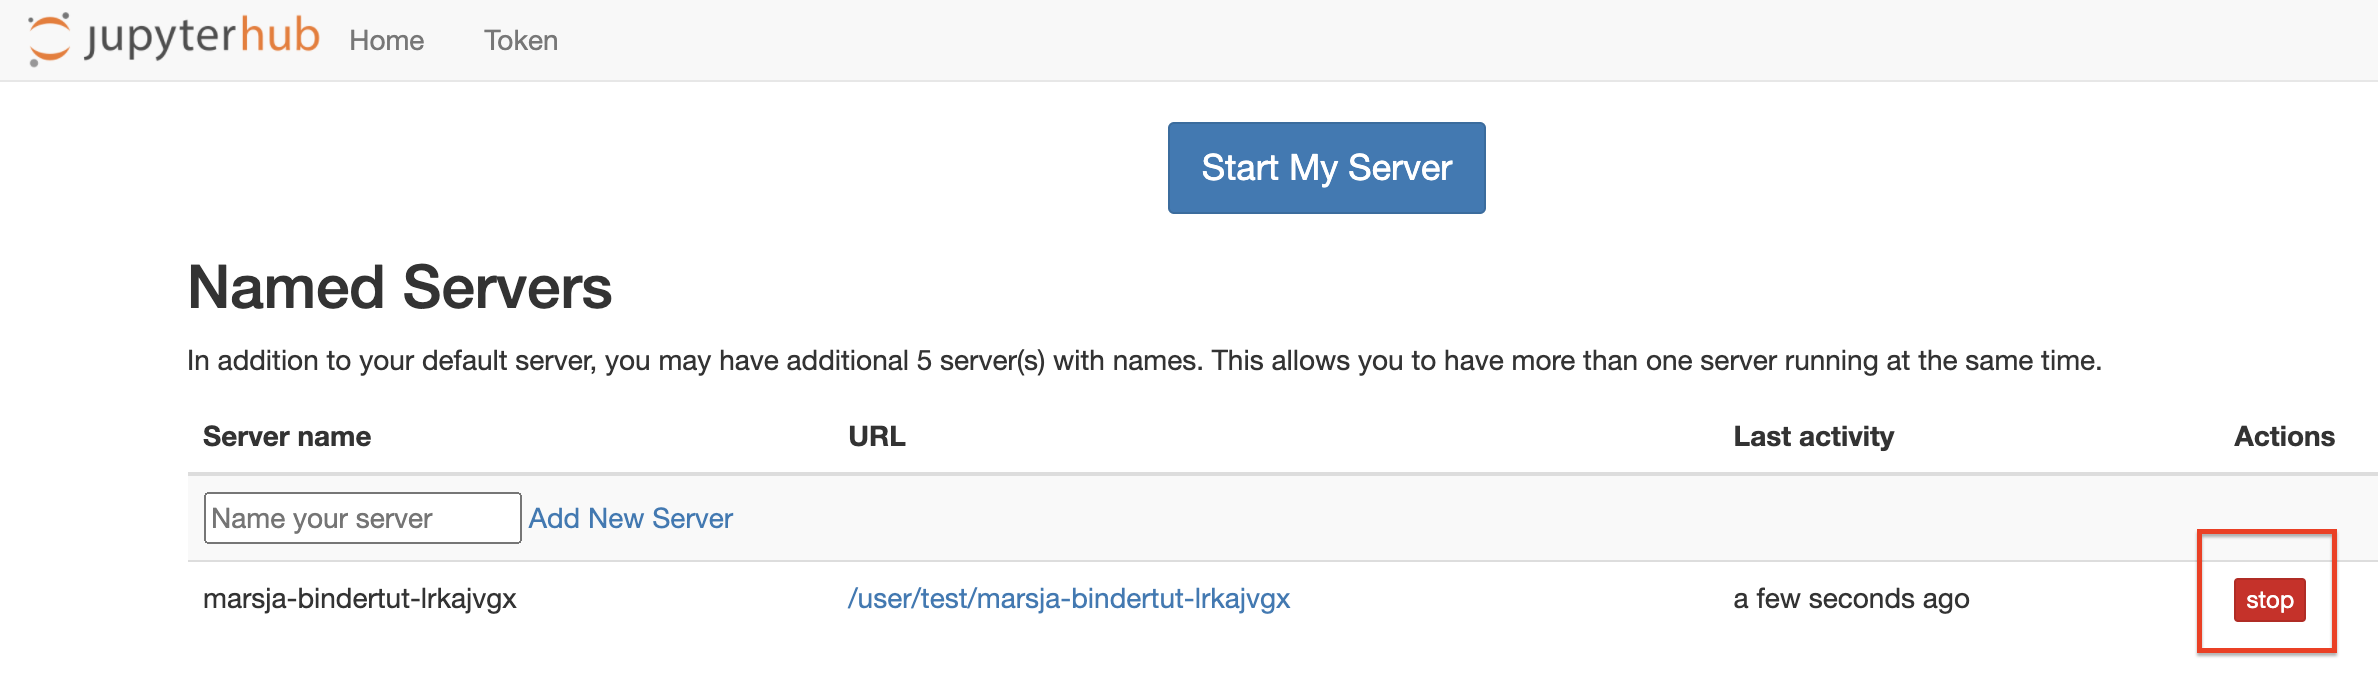
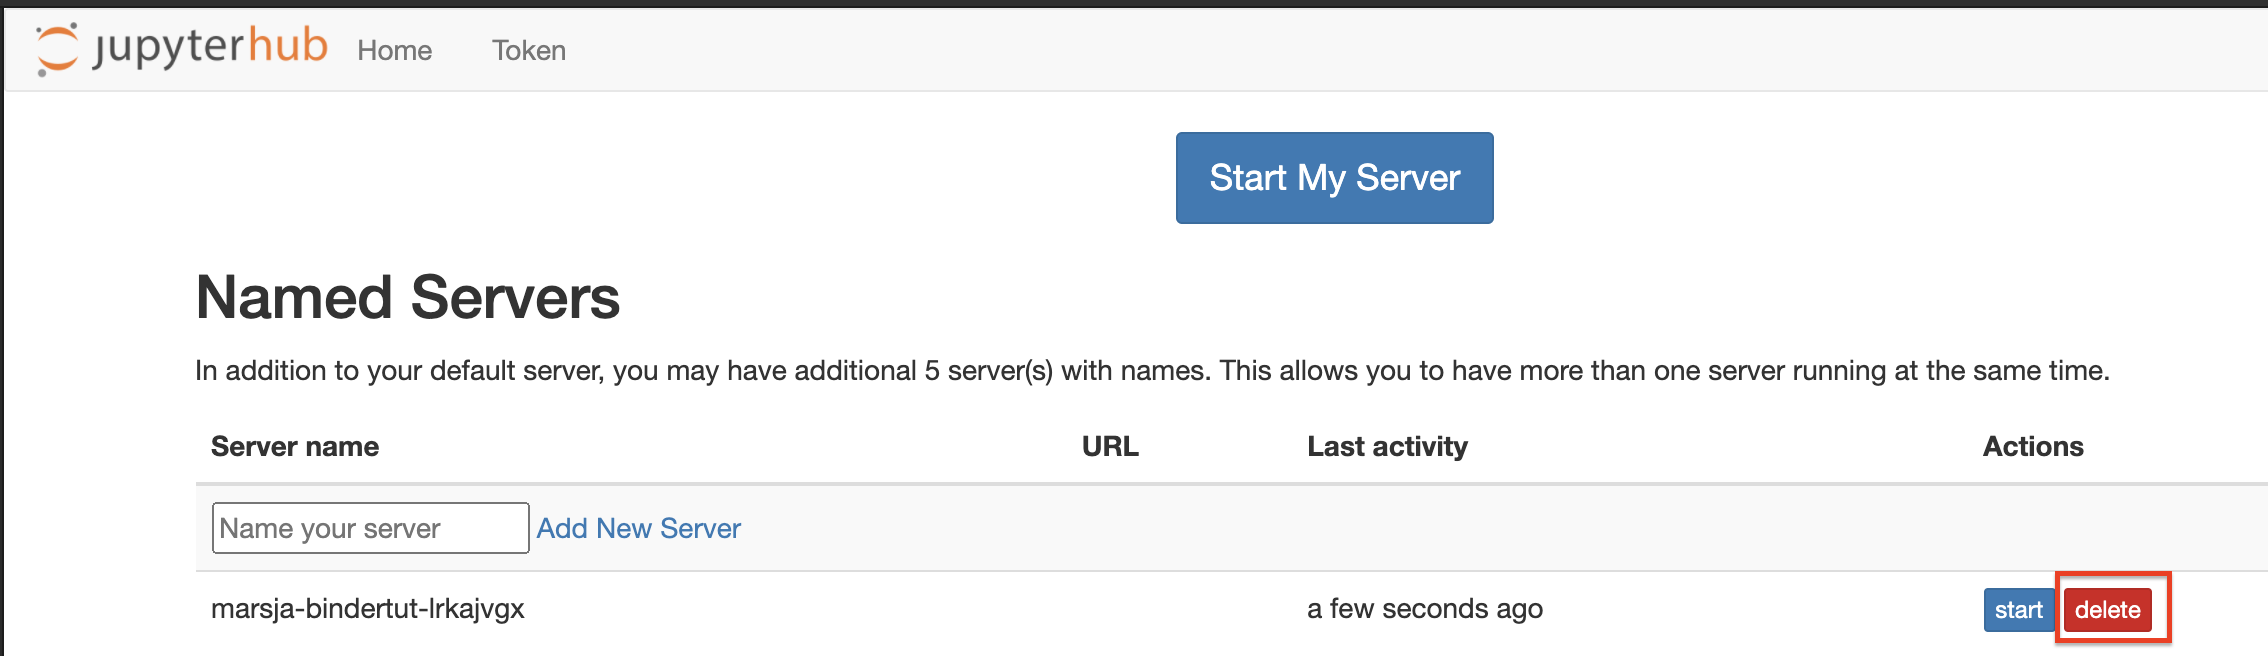
To spawn a new instance, you need to delete one of your running instances. This can be done in the JupyterHub control panel (JupyterHub is used under BinderHub). Navigate to https://bhub.cloud.e-infra.cz/ and stop any instance you don’t need. If you see a red Delete button, click it. After that you should be able to spawn a new instance at binderhub.cloud.e-infra.cz.
❗️Notebooks are automatically deleted after one week of inactivity (inactivity = idle kernel or no connection to notebook).❗️
Customizations
Custom Dockerfile
The Hub spawns notebook instances with a default image that does not contain any special libraries. However, you can create a custom Dockerfile with all dependencies that will be used as the base image. The Dockerfile must be located in the repository you want to launch in Binder.
When creating the Dockerfile keep in mind that it must be executable as user. It is also important to chown all directories used to user, e.g. :
RUN chown -R 1000:1000 /work /home/jovyan
Installing Miscellaneous Libraries and Software
Creating a custom dockerfile might be overkill for your needs, so there are several other ways to install e.g. the conda' environment, Python’ packages or some `Debian’ packages (e.g. vim).
See all possible file types for a full description and intended use that can be included in the repository. These files will be resolved at startup. You can include multiple files in the repo, so if you need to install Python packages as well as some Debian packages, both apt.txt and requirements.txt may be present.
Short list of files:
environment.yml- conda env, example- pipfile` - Python env, example
- setup.py` - Python packages, example
- requirements.txt` - Python packages, example
project.toml- Julia environment, exampleapt.txt- Debian packages, example- install.R` - R packages, example
See binder examples repository for many types of repositories, file combinations and interesting uses.
Unknown Error During Spawning
If you encounter an unknown error while spawning a notebook (or if your notebook does not spawn at all), please send an email to IT Service Desk.